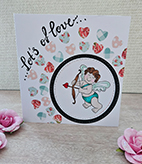
We’re back with a new card! This time I was inspired by a card I came across in “Die Cutting Essentials” of December 2023. I was completely inspired and started working on the idea. This is the result:
Instead of “die cuts” I just used a heart punch and a compass to draw the circle for my lettering.
Because I am currently completely into “hand lettering”, I have written the text. The sweet little Cupid comes from Kate Hadfield designs “Love and Romance” digital stamp set. I colored the Cupid. Oh and I’m not being completely honest because I also cut two circles from cardstock. I punched the hearts around the circle with my heart punch from various design papers (leftovers).
This turned out to be a lovely fun card that I can probably make someone happy with on Valentine’s Day!
I would like to thank everyone who comes to take a look at my blog and wish you all a very nice healthy new year with lots of time to craft and have fun!
I’m so excited to announce that I have joined Kate Hadfield’s Design Team!
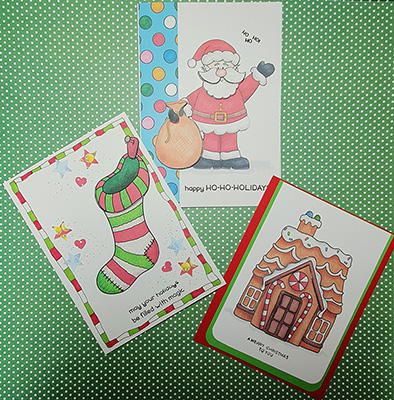
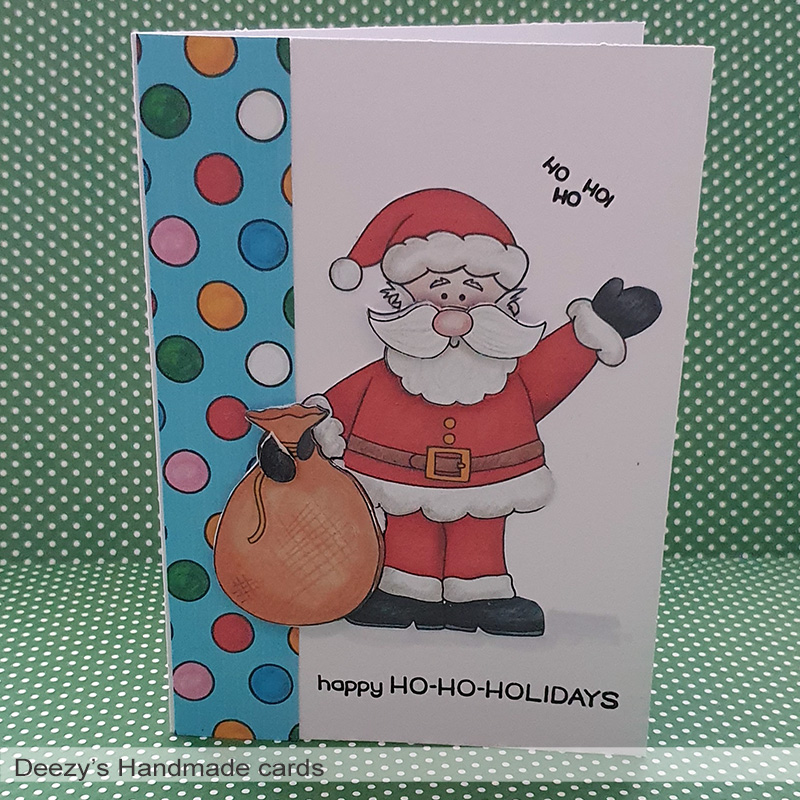
I was excited to work with the Cookies for Santa kit. It’s so cute! I have made some cute and very simple christmas cards with it.
Here is what I have created:
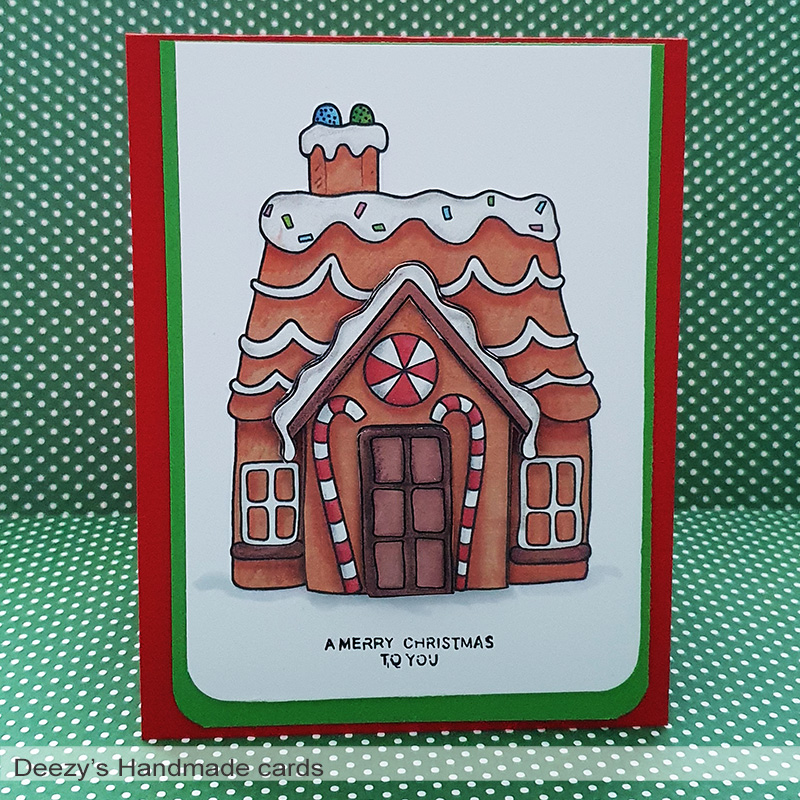
For the gingerbread house card: I first printed out the digi three times and layered them up my white top card. I glued the white card to an christmas green card and then on a red base card. As simple as that! The images in the kit are already colored, so no colouring this time.
Finally, I stamped some christmas wishes with an christmas stamp from my stash .
With the Cookies for Santa kit, the card has become a beautiful christmas card! But as you might now, I looooove cute papers: so for the Santa card I used also a cute paperpack too: Jingle All the Way paperpack. The cards were very ease to make, simple and with a good result! I love that!
This card is the last for now. Sometimes you just have to start crafting to get on a role! For this card, I have doodled a border around the card in the same colors as the christmas sock. I punched a few stars and hearts from some paper snippets and I have glued them around. And finally I used my fineliner to add some little dots here and there. I have used no very expenses equipment: just a few markers and some paperpunches, that is all.
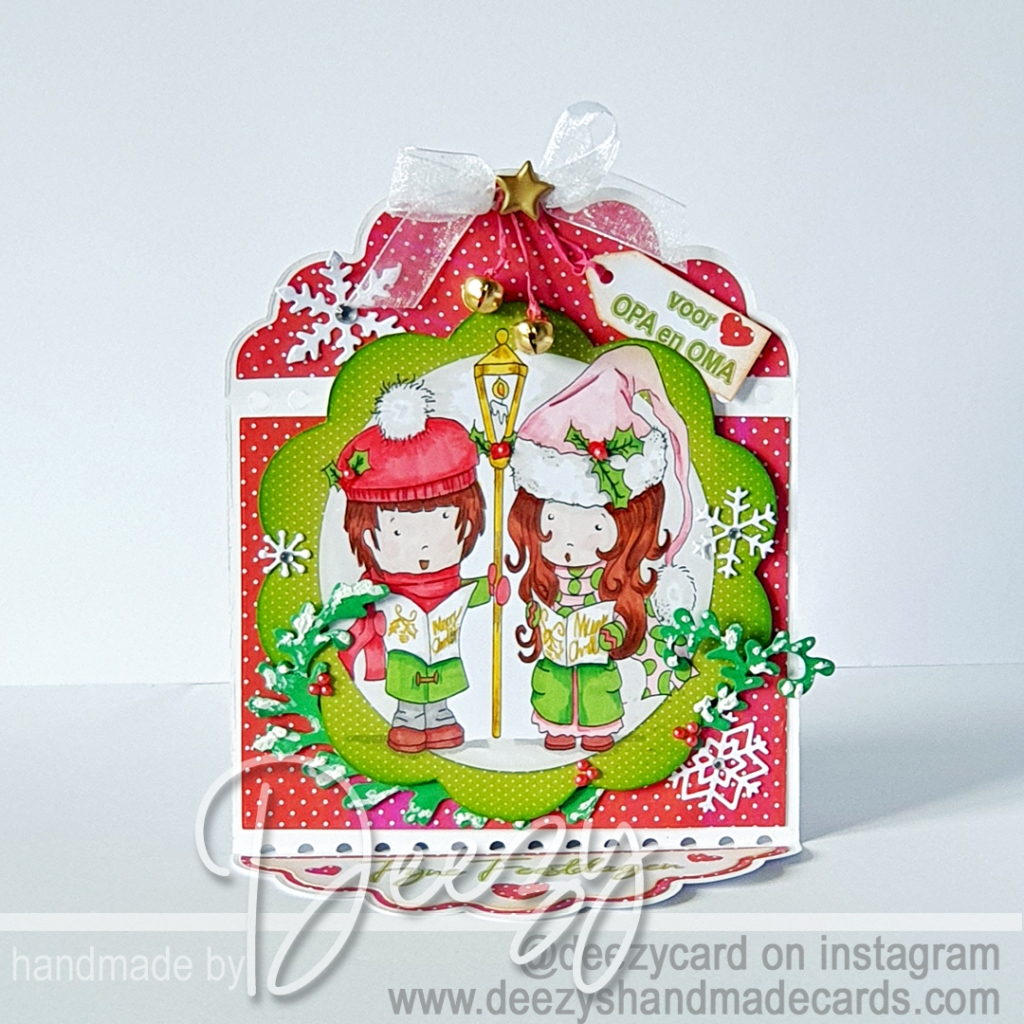
It’s Tuesday! New challenge starts over at Digi Choosday today! As always it is anything goes but the design team is sharing their makes with a given theme. This week we are challenged to make a A card for the grandparents. We are also challenged to use a circle die and create a frame for the card!
This is my card:
Ahw, my grandpa and grandma … Unfortunately I have been missing them for a while. Nevertheless, I really enjoyed making this card! So, with my grandparents in mind, I have been crafting this project! They will have loved it 🙂 I have the cute digistamp and the background paper all from the Festive Hollybobs collection ! This fantastic Collection is all about everything Christmas Holidays related and includes a lot of great stuff to make a whole bunch of christmas related projects! The Festive hollybobs collection is a part of Polkadoodles Character Series. The Work & Play collections are a serious of downloads perfect for all those work related jobs and hobby themes – choose from musical instruments to Farming, Police, Firefighters and 100s of great themes! Available with co-ordinating papers and sentiments for each theme.
Details about my card: – First I selected my digi stamp and the design paper and printed it out. I printed the background paper on thin paper and the stamp on thick paper; – now that I know the main colors of my card, I also know the color scheme that I will use for the stamp; – this time I used my Promarkers to color the stamp; – with colored pencil I applied shadow; – the card and background paper are die-cutted with a StudioLight die-cut; – I also die-cut all kinds of snowflakes and 2 Christmas twigs; – I wanted a Dutch text on my card. I printed out “for grandpa and grandma” and made a small tag out of it; – I edited the tag with some distress ink; – I loved the little bells to attach to the top of the card under the bow; – I secured the tulle bow and the embellishments with a brad in the shape of a star; – I also distressed my circle frame a bit; – then I glued everything onto my main card; – I glued little glitter stones to the snowflakes; – and I smeared some fake snow on the twigs; – I once bought ugly white sticky pearls in a sale. I colored a few of those small sticky pearls red with an alcohol marker and stuck them on the twigs; – the text at the bottom of the card is Dutch for Happy Holidays; – I couldn’t resist punching and gluing some more hearts out of the remaining background paper.
It was really a joy to work on this card.
Wishing you all the best and hope to see you next time again! Good luck with challenge at Digi Choosday ! The Digi Choosday Challenge runs every week, it is always anything goes so there is no reason not to enter and you never know you may just win!
And if you would leave me some love on my blog: click on the post title and scroll all the way down to the post. There will you find the comment section! Thank you so much!
A huge welcome to everyone – new followers as well as old friends. I am very grateful for all of you wonderful people who follow me from week to week and month to month. And here we are at the start of October! It is hard to believe we are ready for a new Place to Start challenge. I hope today you will find some wonderful inspiration today!
So lets see what I have made:
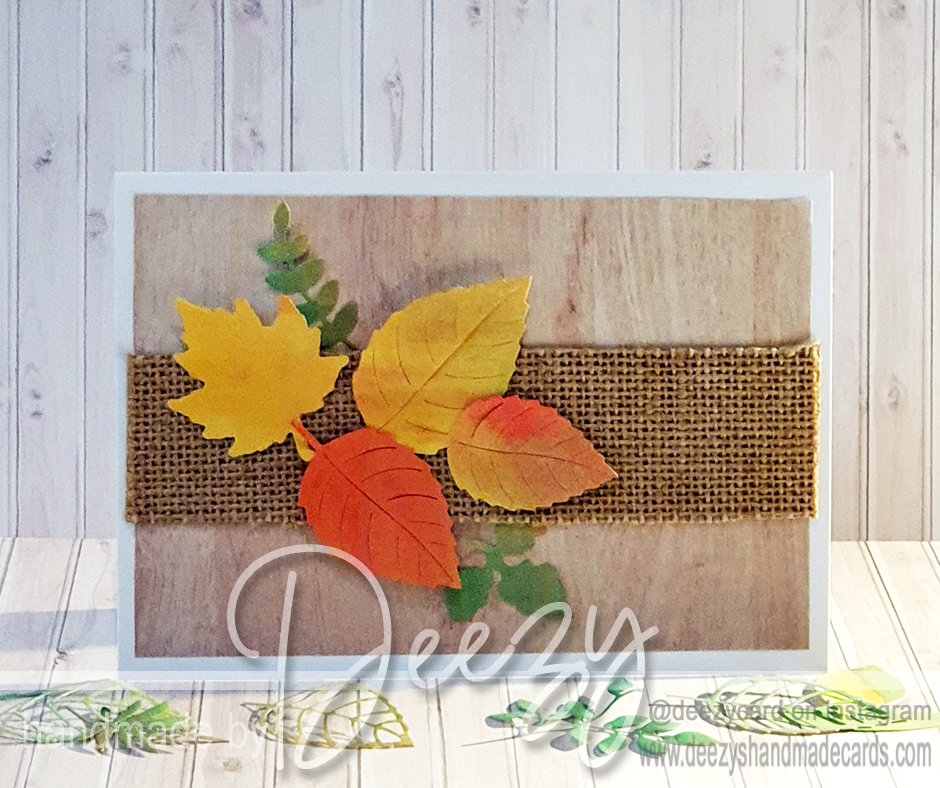
This is how I made my card: – I first I gave a piece of printer paper a watercolor wash with the colors red, green and yellow; – I let this paper dry overnight; – I have cut out various leaves with dies of different brands; – I took a blank card; – I glued a design paper in a wood color on it; – there I glued a jute strip; – and there I glued my autumn leaves!
And that’s actually it! Very very simple! But sometimes life can be very simple 😉 I did not put a sentiment on the card yet. Maybe or maybe not I might do that later… I have not done this so far, because this card could be sent for various occasions. And perhaps there is no sentiment at all: you know: for an occasion for which you simply have no words for!
Thank you very much for visiting my blog. I am delighted with the comments you leave. Take care of yourself and your loved ones and I hope you will come back soon to have a look.
And if you would leave me some love on my blog: click on the post title and scroll all the way down to the post. There will you find the comment section! Thank you so much!
Hello dear people! How are you! We are already in the first week of October: I just can’t believe it. Summer is definitely over and we are making Halloween cards!
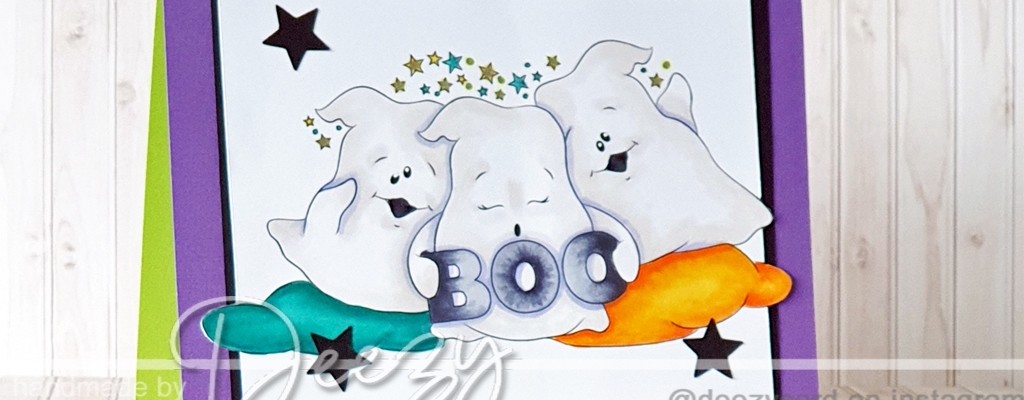
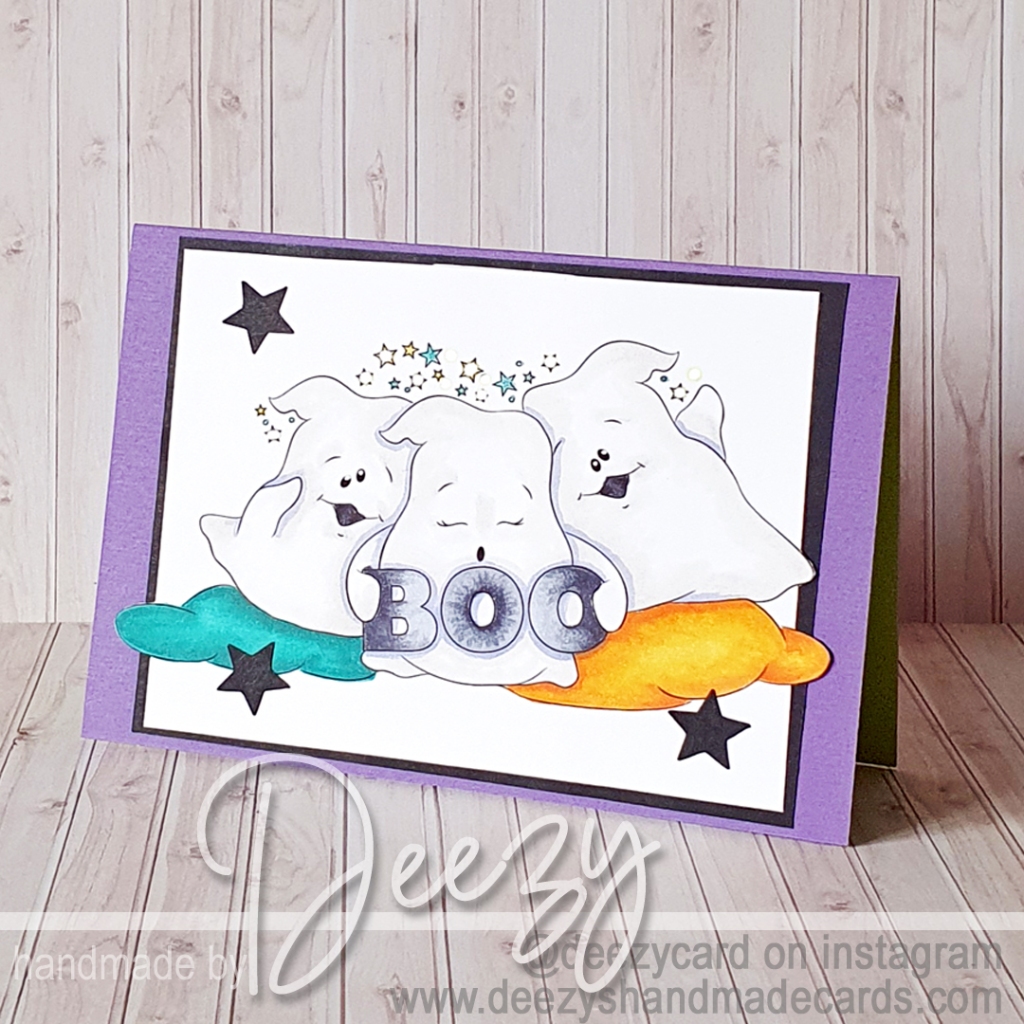
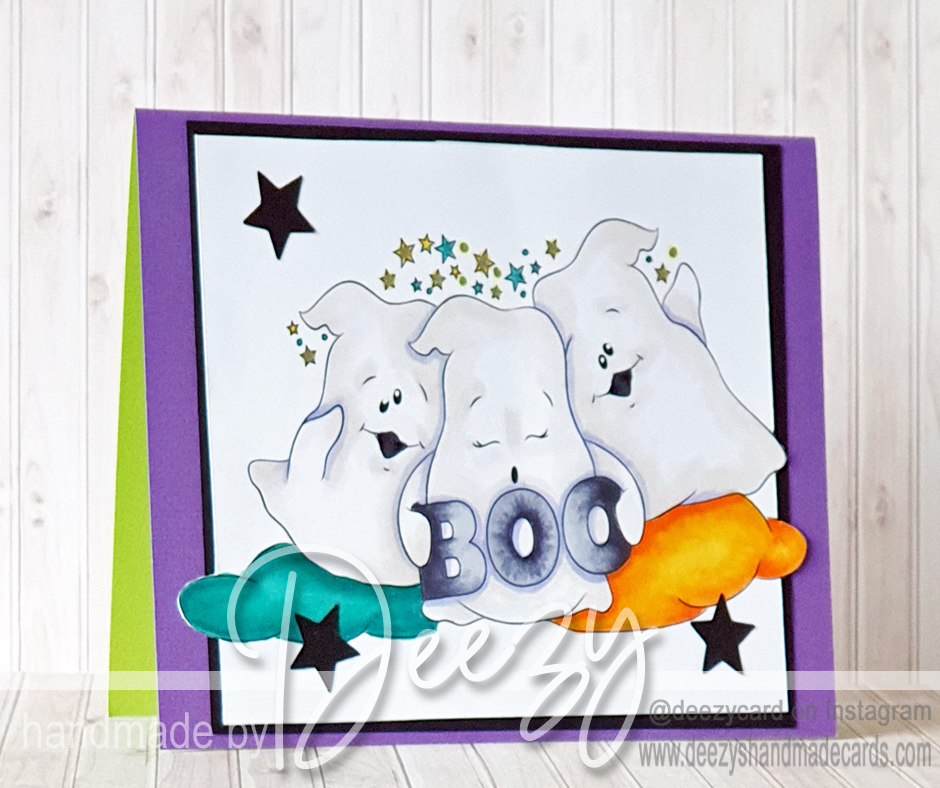
This is my card using the image called Ghostly Trio.
“Aren’t they super cute?!” The illustration is very easy to color!
Details about my card: As you can see the design is very simple, although it is not easy to give the three ghosts a color 🙂 I dotted the stars in the background with glitter markers. I still had some black punched-out stars from my previous project and I used them in this card.
This Halloween greetingcard is not scary at all and that is sometimes nice for a change!
With this card I would love to play along in the following challenges:
Wishing you all the best and hope to see you next time again! Good luck with challenge #261 at Aud Sentiments ! And if you would leave me some love on my blog: click on the post title and scroll all the way down to the post. There will you find the comment section! Thank you so much!
Good Morning my lovely crafty friends. I hope you are well and having a good time! Today is the start of a new Creative Knockouts Challenge. This time the theme is: Fall. The prize for one lucky winner is $10 store gift certificate from Jan’s Digis Stamps.
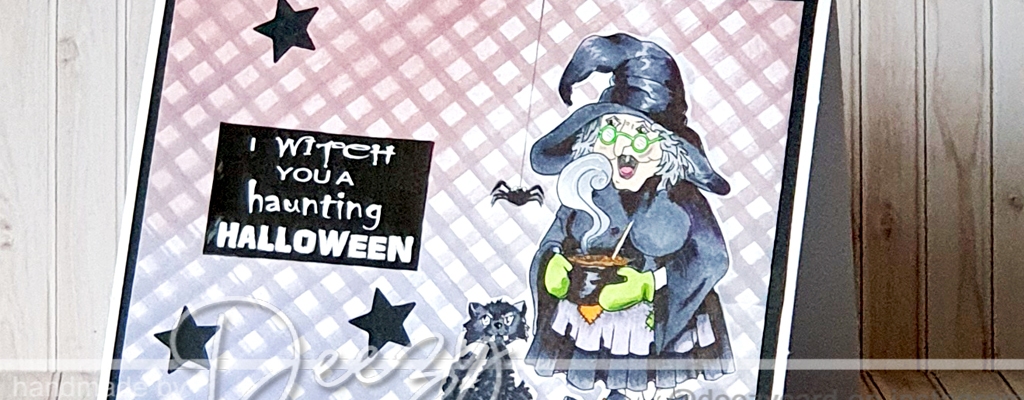
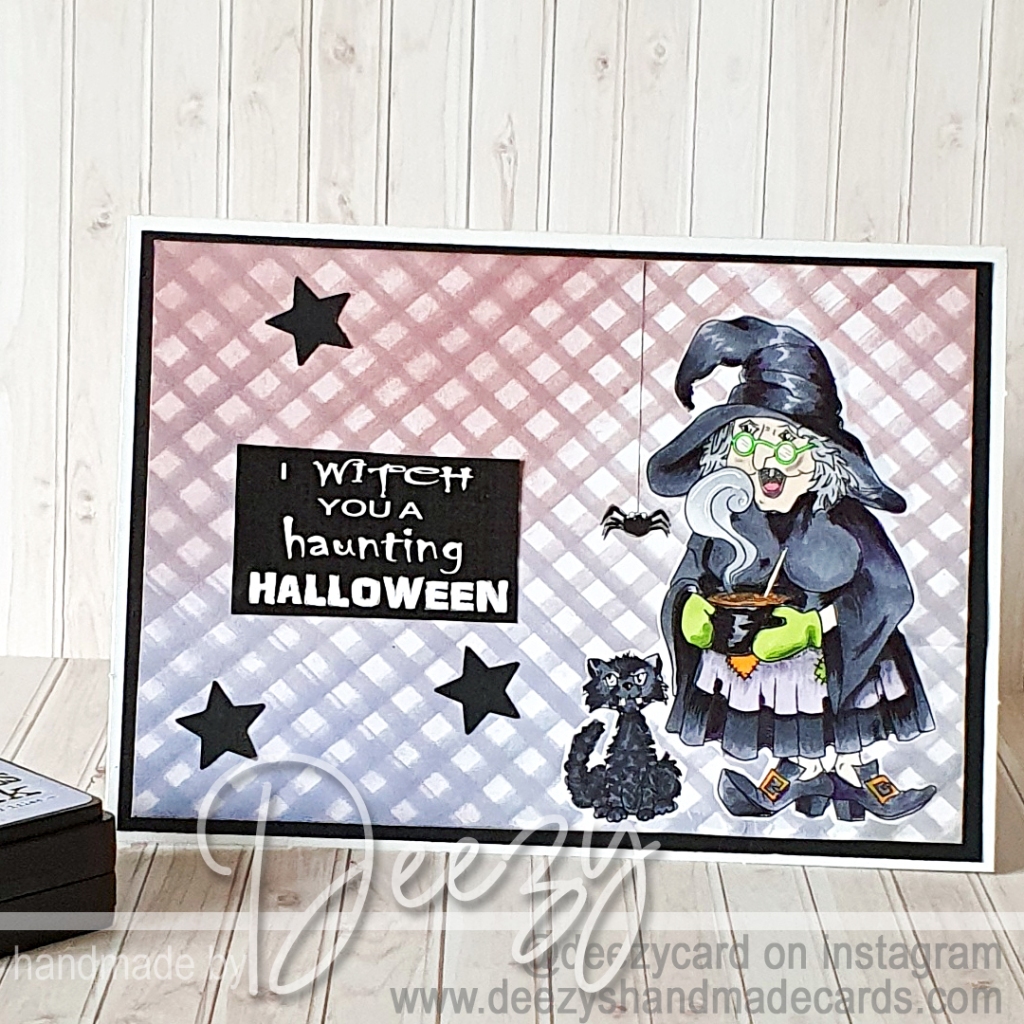
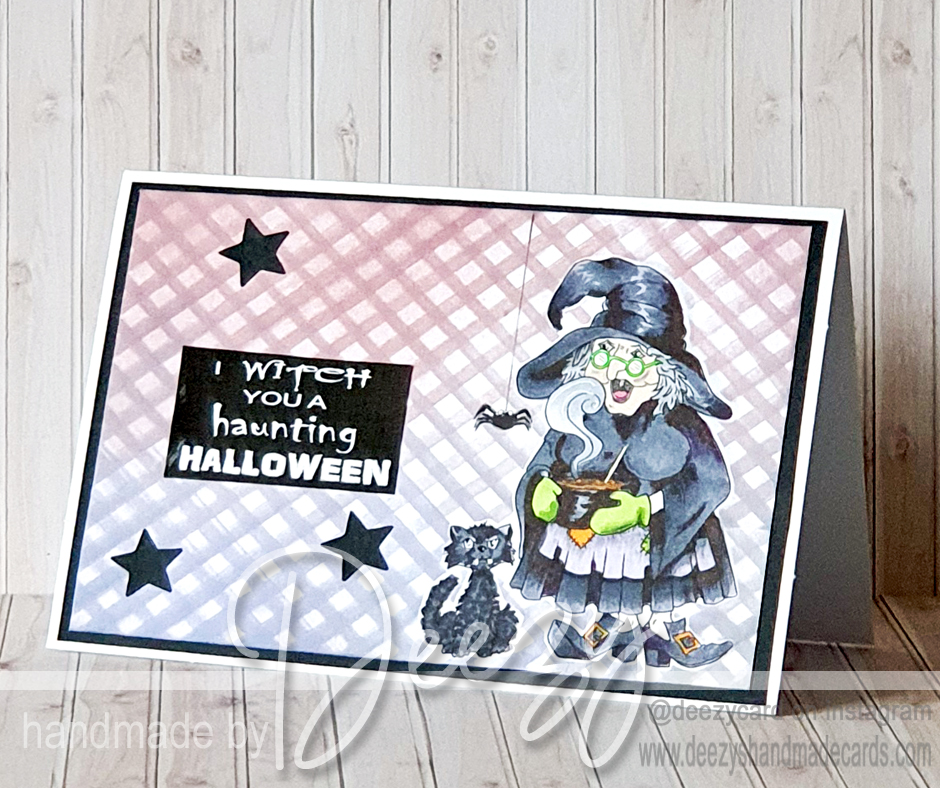
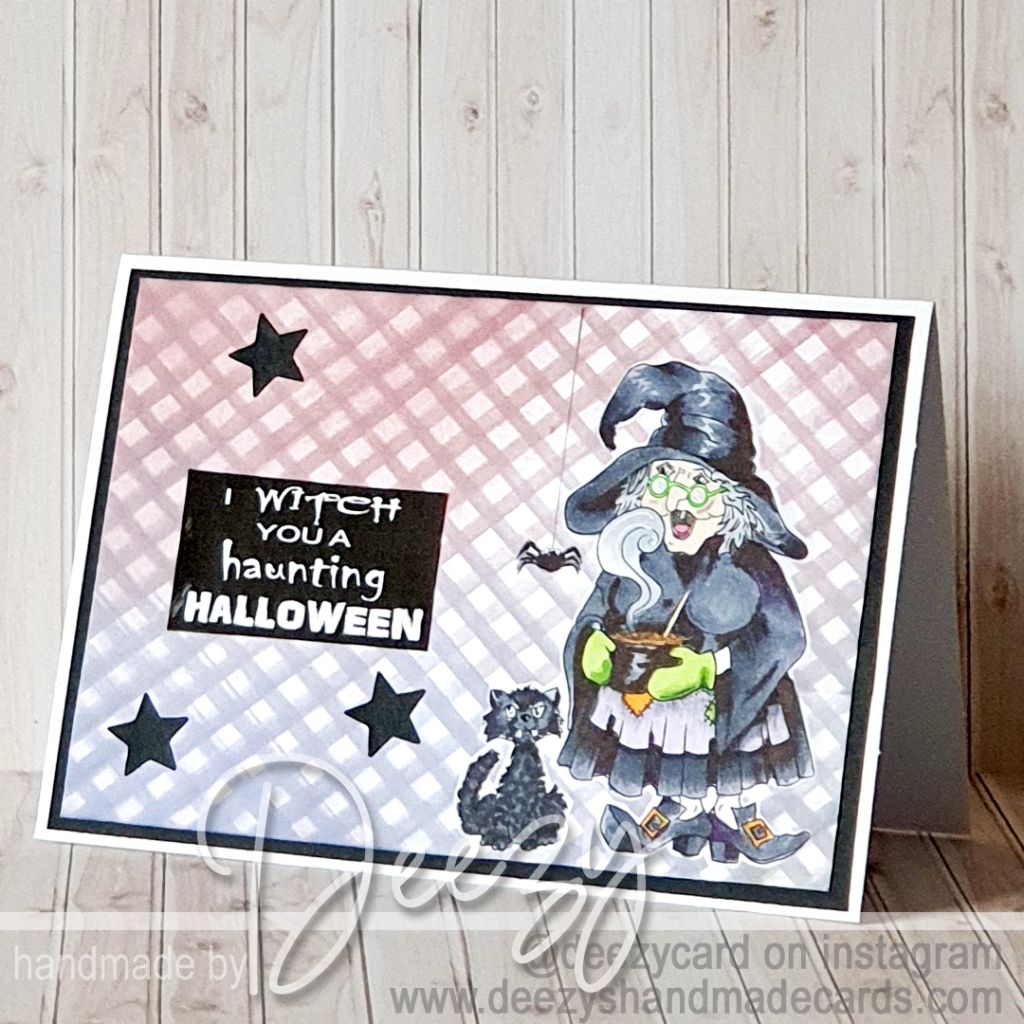
My card features the very “witchy” digistamp that comes with a sentiment: Witches Brew.
I can hear you thinking, “Deezy it must be a fall theme …!” But my little witch is cooking a nice fall brew … duh!
This is how I have made my card: – My background is inspired by Nichol Spohr and I just wanted to try it out for this card. I used some distress ink and a stencil that I have had for years;; – I printed out the very cute image on a blanc card; – I printed out my image again on a scrapprinter paper en cut this out; – I lay it on top of my original card and stamp en stick it with some tape; – I put my stencil on top of the card and than I started to distress ink the whole card; – I colored my image with my alcoholmarkers; – I punched out some black stars and glued than on my card; – I glued my card on some black cardstock; – I edited the sentiment in photoshop because I would like white text on a black background; – I placed everything on a blanc card; – and that is it!
Does the smell of the witch’s fall brew already come to you?
I would like to enter my card into the following fabulous challenges:
Thank you so much for taking the time to stop and look at my card today, I really do appreciate it. And if you would leave me some love on my blog: click on the post title and scroll all the way down to the post. There will you find the comment section! Thank you so much!
It’s Tuesday! New challenge starts over at Digi Choosday today! As always it is anything goes but the design team is sharing their makes with a given theme. This week we are challenged to make a Thanksgiving card or an Christmas inventations and it has to be an interactive card too!
This is my card:
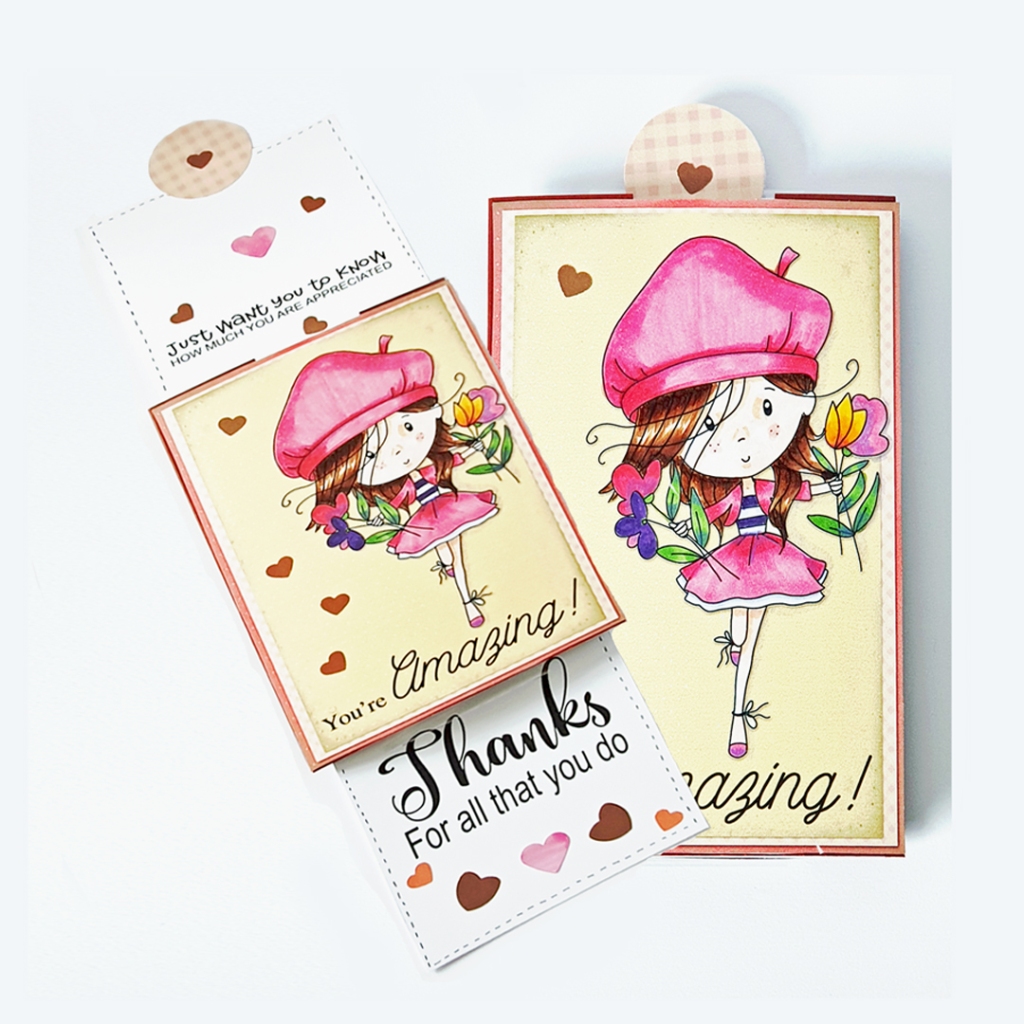
An interactive card … hmmm We do not realy celebrate Thanksgiving in the Netherlands, but there are plenty of people to thank 🙂 So I decided this week to make a Thanksgiving interactive Double Slider Card! I have lots of fun because I enjoy using and coloring the lovely Winnie Sunshine Delightsdigistamp and I have used the Lil Miss Sugarpops Distress Ink Papers papers.
I really love the effect of the double slider card: it is a real surprise when you pull the little circle on top of the card!
Wishing you all the best and hope to see you next time again! Good luck with challenge at Digi Choosday ! The Digi Choosday Challenge runs every week, it is always anything goes so there is no reason not to enter and you never know you may just win!
And if you would leave me some love on my blog: click on the post title and scroll all the way down to the post. There will you find the comment section! Thank you so much!
Hello my crafty friends! It’s time again, for an other challenge over at The Creative Knockouts!
About the sponsor: This challenge is sponsored by: Crafty Sentiments Along with images provided to the design team, they have also offered up a prize, you can win: 3 images to one lucky crafter!
I was inspired by an card from issue 87 from Creative Stamping!
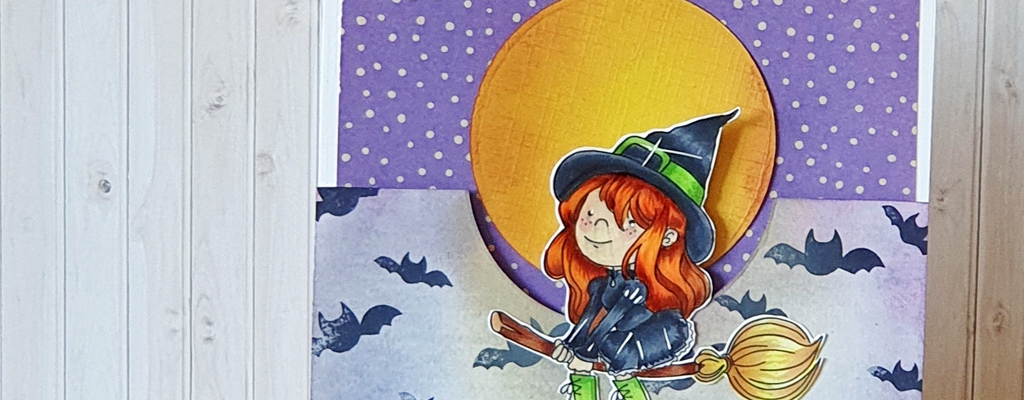
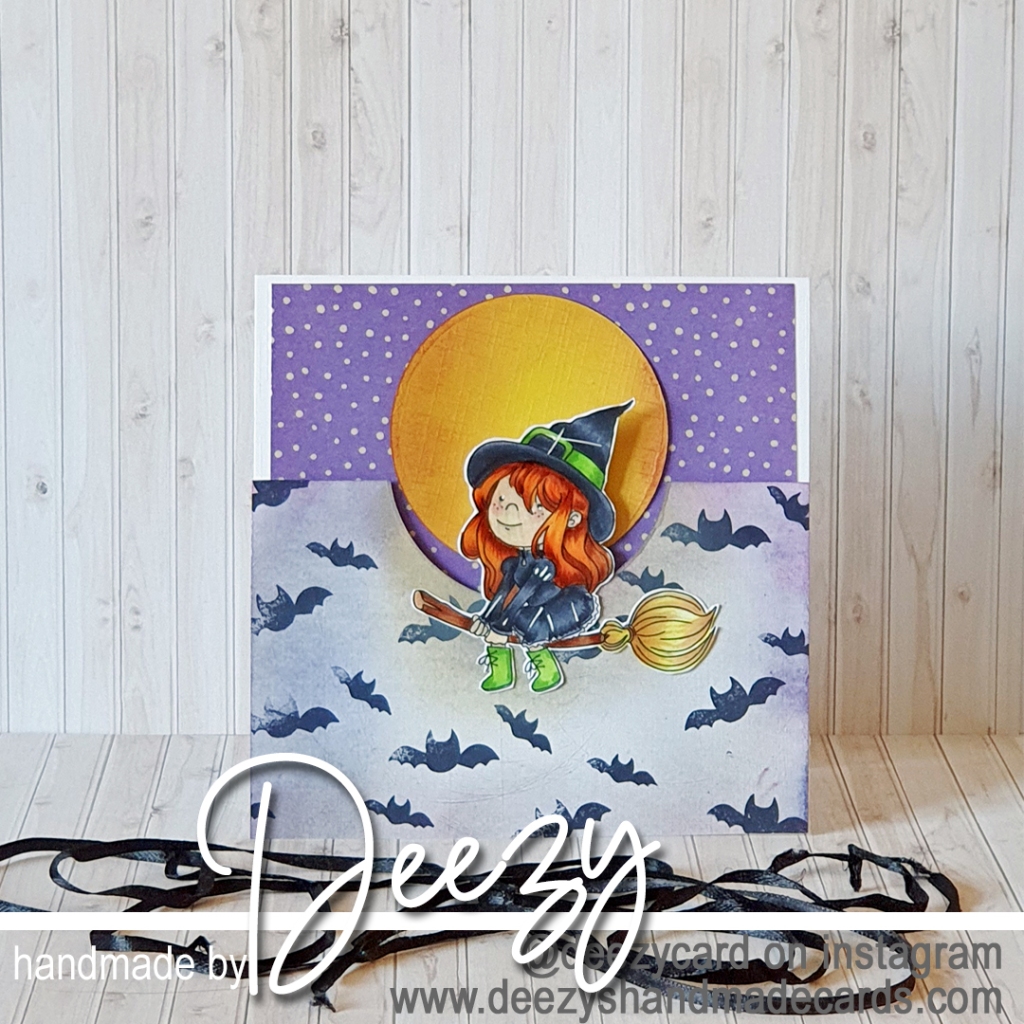
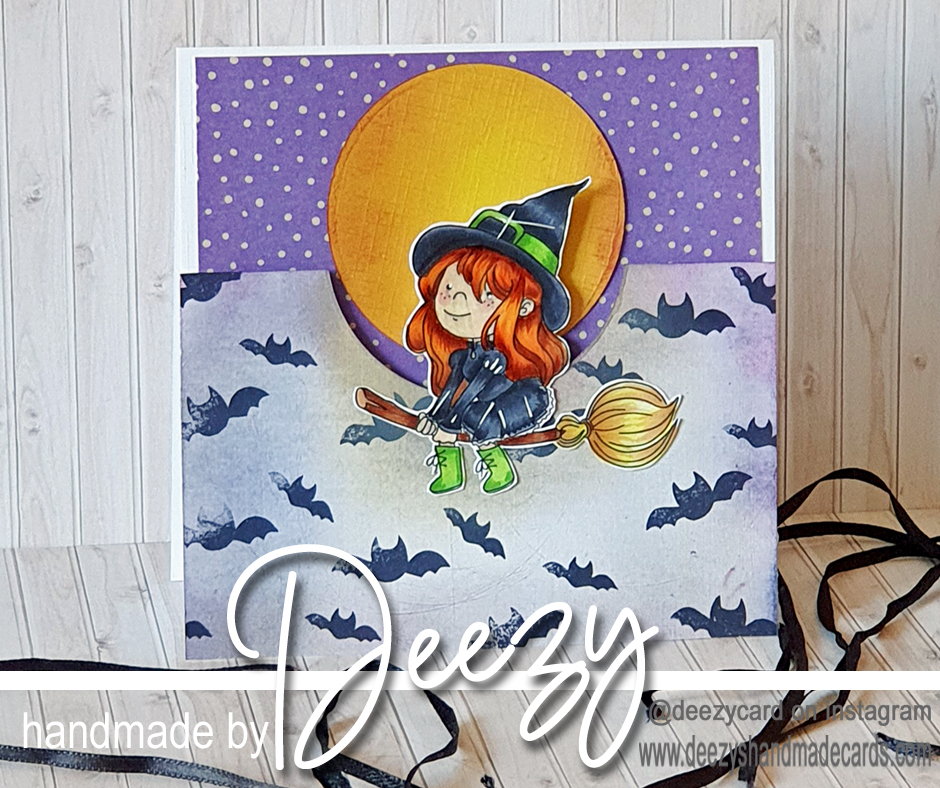
Some details about my card: I first printed out Harriet on 200 grms printer paper and decided what the color of her outfit should be; I colored Harriet with my copic markers; I Die-cut a circle in the front of a 7cm square white card and than cut the top section; I stamped it with some little bat stamps; I distress the white front-circle die-cutted card with some Halloween collors; I placed on a white card, a piece of a design paper from a Craft Sensations paperpad; I die-cut out a yellow circle from a piece of cardstock; I distressed the moon because I like a little distress on my moon; I placed the moon on my background paper; I glued Harriet on front of the card so it looks like she is really riding her broom…..
Well Harriet is ready for her Halloween party!
Be sure and join in our weekly challenge at The Creative Knockouts! Please click on the link to join in the fun, I can’t wait to see what you create!!!
And if you would leave me some love on my blog: click on the post title and scroll all the way down to the post. There will you find the comment section! Thank you so much!